5 Inch gauge railway wagon CHD (part 2)
The first parts to be made are the wheels and the axles. The drawing did not have any details on the wheels and therefor I did some homework to draw the wheels and axles first. Next step are the bearing blocks.
Step 3 the wheels.
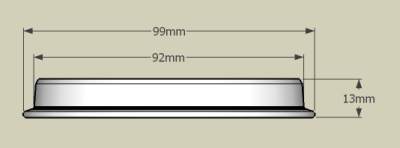 I did draw the wheels first in order to know what the dimensions for the 5 inch gauge wheels should be.
Additionally the axels were drawn. I purchased cheap in-line skates bearings which will be used as bearings on the
axels. The lifetime of these bearings schould be sufficient for the ocasional use in the wagon. The bearing dimensions
(internal 8mm, external 22mm) also dictate the axle and bearingblock dimensions.
I did draw the wheels first in order to know what the dimensions for the 5 inch gauge wheels should be.
Additionally the axels were drawn. I purchased cheap in-line skates bearings which will be used as bearings on the
axels. The lifetime of these bearings schould be sufficient for the ocasional use in the wagon. The bearing dimensions
(internal 8mm, external 22mm) also dictate the axle and bearingblock dimensions.
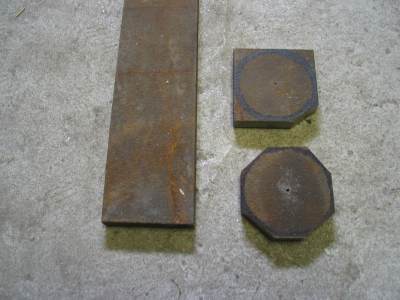 At my local metal supplier I purchased a piece of flat bar 105mm x 15mm x 1000mm. They did not have a round 100mm bar which
would have been easier. I used the 4x6inch bandsaw to cut it into square parts as shown on the photo. Next step was to
cut the corners. This was done by removing the vice of the bandsaw and mounting the square part to the bed of the bandsaw.
Then the part was rounded with a course file. The part was then placed in the independant 4-jaw chuck of the lathe for boring the 12 mm hole.
after the boring it was mounted on the lathe for turning the final shape using a mandrel in the 3-jaw chuck. First the front and the side was turned.
Then the part was reversed and the back was turned.
At my local metal supplier I purchased a piece of flat bar 105mm x 15mm x 1000mm. They did not have a round 100mm bar which
would have been easier. I used the 4x6inch bandsaw to cut it into square parts as shown on the photo. Next step was to
cut the corners. This was done by removing the vice of the bandsaw and mounting the square part to the bed of the bandsaw.
Then the part was rounded with a course file. The part was then placed in the independant 4-jaw chuck of the lathe for boring the 12 mm hole.
after the boring it was mounted on the lathe for turning the final shape using a mandrel in the 3-jaw chuck. First the front and the side was turned.
Then the part was reversed and the back was turned.
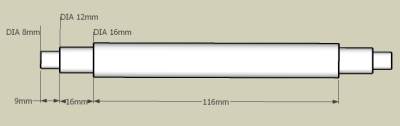 The axles were turned on the lathe outoff a piece of 16mm round steel according to the plan above. The bearings and
wheels are press fitted to the axles using a little bench press I once made.
The axles were turned on the lathe outoff a piece of 16mm round steel according to the plan above. The bearings and
wheels are press fitted to the axles using a little bench press I once made.
Step 4 the bearingblocks.
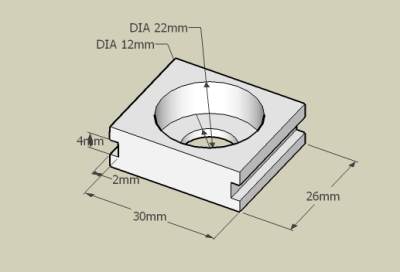 Above the plan for the bearingblocks. The blocks are not exactly to scale (too big) but otherwise the bearing would not fit.
This bearingblock is the structural part. It will be finished later on with a dummy cap which will look like the real thing.
Above the plan for the bearingblocks. The blocks are not exactly to scale (too big) but otherwise the bearing would not fit.
This bearingblock is the structural part. It will be finished later on with a dummy cap which will look like the real thing.
The drawings are made with Google Sketchup. A free drawing tool from Google which is very easy to learn.
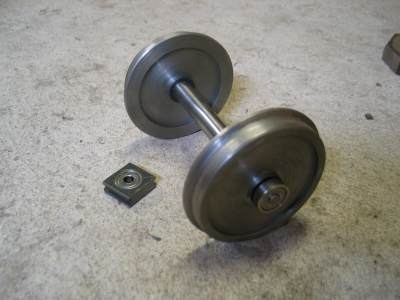 This photo shows the finished axle with wheels and bearings. Note that I also removed material from the back of the wheel to
create an indent, I think this looks better then a flat backside of the wheel.
This photo shows the finished axle with wheels and bearings. Note that I also removed material from the back of the wheel to
create an indent, I think this looks better then a flat backside of the wheel.
CHD part 3 of the build.
- www.schaalbouw.nl/citroen © 2009 E.Paijmans
-

-

-
