Citroën 2CV Restoration, the chassis (continued)
 After re-painting the chassis and other parts
the re-assembly could start.
After re-painting the chassis and other parts
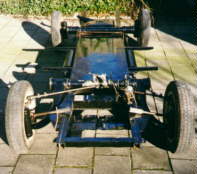
the re-assembly could start.After mounting the front and rear wheel assemblies with the wheel arms and the fuel tank, attention was paid to the suspension elements.
The suspension cylinders containing the springs were fitted with the pulling rods fitted to the front and rear wheel arms. Special oil (so called Ricinusoil, also called wonder oil) was used in the cylinders to prevent the seal of the piston to loosen which apparently is the effect if ordinary oil is used. The seal of the front piston creates an under pressure if the front wheel is moved up suddenly, this under pressure moves the rear piston forwards, increasing the rear of the car also. This is part of the feeling that the 2CV 'floats' over a bump.
The 'batteur', shock absorbers at the wheels, were fitted after checking their function as explained in last chapter.
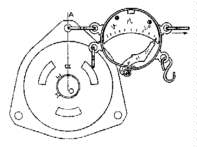 The 'frotteur', friction shock
absorbers, were cleaned and the friction was checked. Originally
'frotteur' were used which were not adjustable. Later types were
adjustable and I replaced my heavily corroded non-adjustables with
a set of adjustables. Adjusting the 'frotteur' can be done as can
be seen in the picture with a simple pullweight or using a torque
wrench. Settings are:
The 'frotteur', friction shock
absorbers, were cleaned and the friction was checked. Originally
'frotteur' were used which were not adjustable. Later types were
adjustable and I replaced my heavily corroded non-adjustables with
a set of adjustables. Adjusting the 'frotteur' can be done as can
be seen in the picture with a simple pullweight or using a torque
wrench. Settings are:
| Front | Rear | |
| Start of slipping, torque | max 0.8 kgm | max 1.3 kgm |
| Start of slipping, reading on the meter | max 13.3 kg | max 21.6 kg |
| Slipping, torque | min 0.6 kgm | min 1.1 kgm |
| Slipping, reading on the meter | min 10 kg | min 18.3 kg |
As can be seen from the table the front 'frotteur' setting deliverers less friction than the rear ones. Therefor without the engine and body fitted the front is still 'jumpy' whereas the rear movement is minimal after a chassis movement.
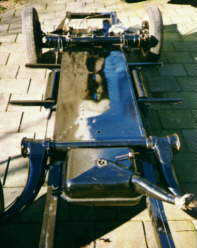 This concludes the suspension
settings, adjusting the front and rear height of the car is done
after re-assembly of the complete car. After this all brake piping
was replaced and a new fuel pipe was bent and installed. Rear brake
cylinders refurbished and re-installed and the main brake
accumulator replaced. Brake pads were replaced, mounted and
adjusted and the brake drum was fitted. The axles were re-furbished
by replacing the cardan joint and mounted into the font wheel
bearings. This makes the front wheel bearings free of play.
Basically the axles hold the wheel attached to the car. A broken
axle can mean the wheel drops off! The wheels were placed to form a
rolling chassis to check the suspension and play on the steering.
Swivel pins were replaced already, which is not very easy and
something I had to out source since I could not persuade them to
move. Front wheel settings were checked also for camber and
convergency. Everything looked OK so I moved on to the next chapter
of the overhaul; the reconstruction of the
body shell.
This concludes the suspension
settings, adjusting the front and rear height of the car is done
after re-assembly of the complete car. After this all brake piping
was replaced and a new fuel pipe was bent and installed. Rear brake
cylinders refurbished and re-installed and the main brake
accumulator replaced. Brake pads were replaced, mounted and
adjusted and the brake drum was fitted. The axles were re-furbished
by replacing the cardan joint and mounted into the font wheel
bearings. This makes the front wheel bearings free of play.
Basically the axles hold the wheel attached to the car. A broken
axle can mean the wheel drops off! The wheels were placed to form a
rolling chassis to check the suspension and play on the steering.
Swivel pins were replaced already, which is not very easy and
something I had to out source since I could not persuade them to
move. Front wheel settings were checked also for camber and
convergency. Everything looked OK so I moved on to the next chapter
of the overhaul; the reconstruction of the
body shell.
- www.schaalbouw.nl/citroen © 2014 E.Paijmans
-

-

-

-

-

-

-

-
