Citroën 2CV Restoration, taking it apart
After painting the body shell I prepared the final mounting of the body shell to the chassis.
 First I treated the body shell and chassis with waxoil. I do
this on a hot day normally because it really makes quite a
difference in applying the waxoil. All small and large box sections
were treated to hopefully extent the lifetime a few years longer
than the 38 it already made.
First I treated the body shell and chassis with waxoil. I do
this on a hot day normally because it really makes quite a
difference in applying the waxoil. All small and large box sections
were treated to hopefully extent the lifetime a few years longer
than the 38 it already made.
For mounting the body shell I use the following procedure:
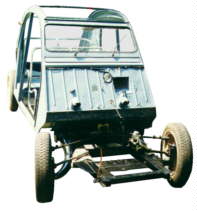
- Lift the body shell on the chassis (two persons are able to do this, I usually do this with my wife). I position it carefully for the holes in the body shell to match the holes in the chassis. I noted the position of the front and end of the floorplates. I do this to be able to locate the position of the rubber seal between the chassis and the body shell.
- The chassis and body shell is separated again to be able to position the cage nuts (M7) and the rubber seal strip. This strip is glued under the areas where the chassis meets the body shell.
- Again place the body shell on the chassis and cut out the mounting holes in the rubber seal, which simplifies the final mounting. I used M7 screws with 12 heads used on the older models (before '63?). Apart from 2 holes, which needed minor correction, all holes matched.
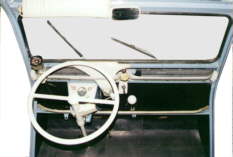
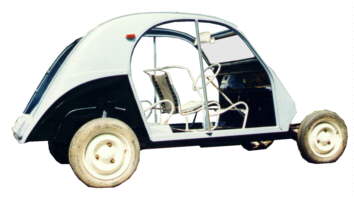 As can be seen on the photographs I assembled some smaller components like
the ventilation plate, side indicator lights, front window, screen
wipers and steering wheel (temporary). I also trail fitted the
frames of the chairs. I could sit in the car for the first time
after years and must say it felt good. This was also an opportunity
to feel how the suspension reacted.
As can be seen on the photographs I assembled some smaller components like
the ventilation plate, side indicator lights, front window, screen
wipers and steering wheel (temporary). I also trail fitted the
frames of the chairs. I could sit in the car for the first time
after years and must say it felt good. This was also an opportunity
to feel how the suspension reacted.
TIP1: The ventilation plate is fitted in a rubber seal which also functions as the hinge. The rubber from the old car was worth saving. It was not torn or dry but it was very dirty and stiff. I normally clean these rubber parts with garage soap, ready available from car shops, to clean your hands. This stuff works well to clean and soften the rubber without being aggressive to it. After the cleaning I treat it with talk powder to soften the rubber (any thing which soften a baby bottom…..). My experience is that rubber treated this way looks good and last long.
TIP2: To mount rubber around the ventilation plate there is this small strip of metal used to secure the rubber. You can bend the strip outward and try to bend it back evenly but I use the following technique; leave the small strip in the original position but get waxoil in between the strip and the base plate. The waxoil function in two ways, it lubricates the rubber helping it to slide into position and protects the strip against rust in the future. To mount the rubber I work it in cm by cm with a small screw driver. This procedure is quit quick and can be used on the door and boot seals too.
TIP3: The red plastic of the rear indicator lights of my car was weathered and looked dull, I gave it a shine and improved the transparency at the same time by using silver polish (stolen from the kitchen) to get them back to former glory. Afterwards a seal with a good car wax should protect them against rain. I used this before on plexi and plastic and it seem to last OK. It might not work for very bad weathered lights but it worked for me and it might work for you too, it saves some money on hard to find good looking parts.
 After this stage
I continued with work on the engine,
mounting the roof and preparing the interior and
cabling and other small parts to be able to mount the engine.
After this stage
I continued with work on the engine,
mounting the roof and preparing the interior and
cabling and other small parts to be able to mount the engine.
- www.schaalbouw.nl/citroen © 2014 E.Paijmans
-

-

-

-

-

-

-

-
