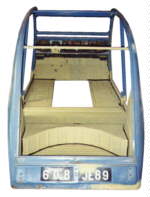
Citroën 2CV Restoration, painting the body shell
After the body work being done and all the bad spots being replaced it was time to paint the body shell. The color used on the car when I bought the car was AC603 a blue used on '59 DSs. I wanted to have it re-painted in the original color AC606, Blue glaciers. A piece in the original color from the interior was used to determine a nearby 'RAL' color, which matched (a bit lighter to compensate for the fading of the color over the years).
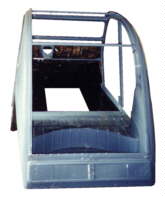
 I started with cleaning all bare metal (small areas) from remaining
rust spots using grid 50 sandpaper. All intact paint surfaces were
lightly skimmed with 400 grid sand paper also taking care the edges
between the bare metal and paintwork were smoothed. Also small
dents and welds were filled to provide a smooth surface. The bare
metal areas were treated with a filling etching primer applied with
a brush for the difficult spots and a roller for the larger areas.
Kit was applied to seal the welds on the inside of the car and a
second coat of primer was applied. The larger areas were smoothed
afterwards with 800 wet and dry sandpaper. After these coats dried
thoroughly I applied two layers of the blue color with a brush. A
roller did not work for me because the paint dried with air bubbles
in the paint. A brush worked fine. Brush paining is a way for me to
keep the house clean and works well if you are prepared to polish
the larger areas to get rid of the brush strokes. On the smaller
areas I did not do this, as the strokes are not very visible there.
I started with cleaning all bare metal (small areas) from remaining
rust spots using grid 50 sandpaper. All intact paint surfaces were
lightly skimmed with 400 grid sand paper also taking care the edges
between the bare metal and paintwork were smoothed. Also small
dents and welds were filled to provide a smooth surface. The bare
metal areas were treated with a filling etching primer applied with
a brush for the difficult spots and a roller for the larger areas.
Kit was applied to seal the welds on the inside of the car and a
second coat of primer was applied. The larger areas were smoothed
afterwards with 800 wet and dry sandpaper. After these coats dried
thoroughly I applied two layers of the blue color with a brush. A
roller did not work for me because the paint dried with air bubbles
in the paint. A brush worked fine. Brush paining is a way for me to
keep the house clean and works well if you are prepared to polish
the larger areas to get rid of the brush strokes. On the smaller
areas I did not do this, as the strokes are not very visible there.
 This is done the following way:
- Get some wet and dry 1200 grid sandpaper and wrap it around a rubber pad normally used to apply filler. This is firm enough to smooth out the brush strokes yet flexible enough to bend around the larger round shapes.
- Use lots of water and start to smooth out the surface. Check frequently to make sure you do not sand through your freshly applied coats. Take special care near any sharp edges.
- After the larger areas are treated this way it is time to brighten up the paintwork and get some shine back. Simply polishing the paintwork with a polish cream and a simple cloth does this. I like to do it by hand but it can be done automatically too.
If this process is done properly it leaves a very acceptable flat surface. If you do not dare to do a complete car, use this technique if you want to repair small patches of paintwork on your car first. It really works for me.
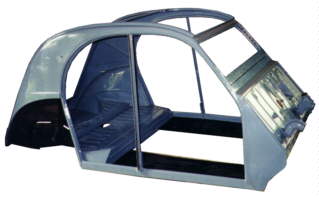 After applying the blue paint
I applied the black paint on the footplates and rear wheel arches.
It started to look like a car again. Now I was ready to mount it on the already prepared chassis.
After applying the blue paint
I applied the black paint on the footplates and rear wheel arches.
It started to look like a car again. Now I was ready to mount it on the already prepared chassis.
- www.schaalbouw.nl/citroen © 2014 E.Paijmans
-

-

-

-

-

-

-

-
